How to Improve Your Deadlift Technique
The deadlift looks straightforward because the goal is easy to understand: lift a loaded barbell from the floor and stand upright. However, performing the movement efficiently requires much more than simply pulling hard. Good deadlift technique depends on a consistent starting position, strong trunk bracing, stable foot pressure, effective hip hinging, coordinated knee and hip extension, and a bar path that remains close to the body.
Learning how to improve your deadlift technique can help you train more productively, build confidence under load, and reduce unnecessary stress caused by poor positioning. A technically efficient lift allows the major muscle groups of the hips, legs, back, and trunk to contribute together rather than forcing one area to compensate for the rest of the body.
The deadlift primarily trains the posterior chain, including the glutes, hamstrings, spinal erectors, and upper-back muscles. It also requires significant involvement from the quadriceps, forearms, abdominal muscles, and lats. Because so many areas must work at the same time, a small setup error can affect the entire repetition.
It is also important to understand that proper deadlift form will not look identical for every person. Limb lengths, hip structure, mobility, training experience, stance width, and the chosen deadlift variation all influence the appearance of the lift. One person may begin with higher hips and a more inclined torso, while another may naturally adopt a more upright position.
The goal is not to copy another lifter’s posture exactly. The goal is to develop a controlled and repeatable technique that matches your anatomy, supports your training goals, and remains stable as the weight becomes challenging.
Understand What Efficient Deadlift Technique Looks Like
Efficient deadlift technique allows you to produce force while maintaining control, balance, and a predictable bar path. It does not require every lifter to begin with the same hip height, foot angle, or torso position. Instead, the movement should reflect the lifter’s individual body proportions while still following several important principles.
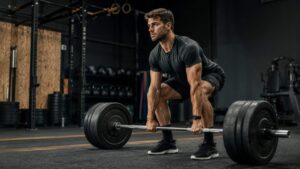
A well-performed deadlift begins with the bar positioned over the middle of the foot. The lifter creates tension before the pull, maintains stable pressure through the feet, and keeps the load close to the body. As the bar rises, the hips and shoulders move together rather than one area lifting far ahead of the other. The trunk remains controlled, and the repetition finishes in a strong standing position.
Beginners often focus only on whether the back looks straight. Although spinal control is important, deadlift technique should be evaluated as a complete movement. Foot pressure, bar position, breathing, lat engagement, hip movement, knee extension, grip, and fatigue management all influence the final result.
Advanced lifters may use slightly different movement strategies depending on their goals. A powerlifter may optimise the setup to shorten the range of motion and lift the heaviest possible load. A general fitness trainee may prioritise comfort, consistency, and muscular development. An athlete may choose a trap bar to emphasise power and reduce technical complexity.
Understanding these differences helps prevent unnecessary confusion. Efficient technique is not about forcing the body into a visually perfect position. It is about creating a strong mechanical relationship between the lifter, the floor, and the barbell.
Treat the Deadlift as a Hip Hinge
The deadlift is primarily a hip-hinge movement supported by knee extension. This means the hips move backward as the torso inclines forward, creating tension through the hamstrings, glutes, and surrounding posterior-chain muscles. The knees still bend, but the movement should not resemble a deep squat in which the hips drop directly toward the floor.
When lifters squat too low during the setup, the knees may move excessively forward and push the bar away from the body. This creates an inefficient starting position because the bar must travel around the knees before it can move vertically. The hips may then rise suddenly as the body tries to find a stronger position.
A simple way to learn the hinge is to stand a short distance in front of a wall with your back facing it. Soften your knees and push your hips backward until they touch the wall. Keep your feet planted and avoid turning the movement into a squat. You should feel tension developing in the hamstrings.
Once the pattern becomes comfortable, practise with a dowel, kettlebell, or empty barbell. The goal is to make hip movement feel natural before adding significant resistance. Developing a reliable hip hinge improves the deadlift setup, lowering phase, and overall control of the bar.
Maintain a Strong, Controlled Trunk Position
A strong trunk position gives the hips and legs a stable base from which to produce force. During the deadlift, the abdominal muscles, spinal erectors, obliques, diaphragm, and deeper trunk muscles work together to resist unwanted movement and transfer force between the lower and upper body.
The instruction to maintain a neutral spine does not mean forcing the back into an exaggerated arch. It generally refers to using a controlled spinal position that can be maintained throughout the repetition. Because natural spinal curves and body structures vary, one lifter’s neutral position may look slightly different from another person’s.
The most important concern is whether the trunk changes suddenly as the weight leaves the floor. If the lower or upper back moves dramatically under load, the lifter may have lost tension, selected too much weight, or started from a weak position.
To improve control, brace before pulling rather than trying to tighten the trunk after the bar has already started moving. Take a breath into the abdomen and sides of the waist, then create firm pressure around the entire torso.
The trunk should feel stable but not excessively rigid. A controlled position allows the lifter to transfer force efficiently while avoiding unnecessary compensations caused by poor breathing, rushed setup, or fatigue.
Keep Pressure Through the Whole Foot
Stable foot pressure is one of the most overlooked elements of proper deadlift form. The foot creates the connection between the lifter and the floor, so changes in balance can affect the hips, knees, torso, and bar path. Ideally, pressure should remain distributed through the heel, base of the big toe, and base of the little toe.
If the lifter shifts toward the toes, the bar often drifts forward. This increases the horizontal distance between the bar and the body, making the movement feel heavier and placing additional demand on the back and hips. Excessive pressure through the heels can also cause problems because the toes may lift and reduce overall stability.
Instead of trying to rock backward or push only through the heels, think about maintaining full-foot contact. The cue “spread the floor” may help some lifters create additional stability through the hips and feet. Others respond better to “push the whole foot into the floor.”
Footwear also affects balance. Soft running shoes may compress and create an unstable surface, especially under heavier loads. Flat, firm-soled shoes or suitable lifting footwear generally provide a more consistent base.
When foot pressure remains stable, the knees and hips can extend more smoothly, and the bar is more likely to travel in an efficient vertical path.
Build a Repeatable Deadlift Setup
A successful deadlift begins before the plates leave the ground. The setup determines whether the lifter can create tension, maintain balance, and place the major joints in positions that support efficient force production. If the setup changes from repetition to repetition, it becomes difficult to identify whether progress is coming from better strength or simply from inconsistent movement.
A repeatable setup should feel deliberate rather than rushed. Approach the bar the same way each time, establish the stance, confirm the bar position, hinge down, grip securely, and then create tension through the trunk and upper body. These steps should become a short routine that can be reproduced during warm-ups and heavier working sets.
Many lifters spend too much time adjusting after they have already gripped the bar. Repeatedly moving the feet, rolling the bar, raising and lowering the hips, or taking several breaths can increase fatigue before the repetition begins. A clear sequence reduces unnecessary movement and helps build confidence.
The setup should also match the chosen deadlift variation. A conventional deadlift usually uses a narrower stance with the hands outside the legs. A sumo deadlift uses a wider stance with the hands inside the knees. A trap-bar deadlift places the lifter within the frame of the bar. Although the positions differ, each variation still requires balance, bracing, and controlled force.
One thing I always recommend is practising the complete setup with lighter weights. Treat warm-up repetitions as technical practice rather than merely a way to increase body temperature.
| Setup Element | What to Do | Common Mistake to Avoid |
|---|---|---|
| Foot Position | Stand with the bar over the midfoot and feet about hip-width apart (for conventional deadlifts). | Standing too far from or too close to the bar. |
| Grip | Use a firm double-overhand, hook, or mixed grip depending on the load and training goal. | Bending the elbows or using a loose grip. |
| Hip Position | Set the hips at a height that allows the shoulders and hips to rise together. | Starting with the hips too low or too high. |
| Core Brace | Take a deep breath into the trunk and brace before pulling. | Pulling the bar before creating tension. |
| Lat Engagement | Tighten the lats to keep the bar close throughout the lift. | Allowing the shoulders to round forward. |
| Head & Neck | Keep the neck neutral by looking a few feet ahead on the floor. | Looking excessively up or down. |
| Balance | Maintain pressure through the whole foot with emphasis on the midfoot. | Shifting weight onto the toes or heels. |
Position the Bar Over the Midfoot
The bar should begin approximately over the middle of the foot because this position supports balance and allows the load to travel vertically. In a conventional deadlift, stand close enough that the bar appears near the shins when viewed from above, but do not begin with the shins pushing the bar forward.
After establishing your stance, hinge at the hips and grip the bar. Then allow the knees to move forward until the shins lightly approach the bar. This sequence helps preserve the hip hinge while bringing the lower legs into an effective pulling position.
If the bar begins too far forward, the lifter must either pull it backward during the repetition or shift body weight toward the toes. Both strategies waste energy. If the bar begins too close and is pushed forward by the shins, the setup may become equally inconsistent.
Avoid rolling the bar toward you immediately before pulling. Although some experienced lifters use a controlled rolling start, it adds complexity and can make the position difficult to repeat.
A useful check is to record the setup from the side. The bar should appear over the centre of the foot before the lifter bends down. This simple adjustment often improves balance, bar path, and the feeling of strength from the floor.
Choose a Secure Grip and Arm Position
A secure grip connects the body to the bar and allows the hips and legs to produce force without energy leaking through the hands or arms. In the conventional deadlift, the hands usually remain just outside the legs. They should be positioned wide enough to avoid rubbing the thighs but not so wide that the range of motion increases unnecessarily.
Begin with a double-overhand grip whenever the load allows. This grip is symmetrical and helps develop natural grip strength. As the weight becomes heavier, some lifters use a mixed grip, hook grip, or lifting straps. Each option has advantages and limitations, so the choice should reflect the training goal.
Keep the arms long and the elbows straight. Do not attempt to curl the bar upward, as this places unnecessary stress on the biceps and does not contribute meaningfully to the lift. Think of the arms as strong cables attaching the torso to the bar.
Grip the bar firmly before initiating the pull. A loose grip can cause the lifter to jerk suddenly as the hands tighten. Chalk may improve grip security when permitted, while straps can be useful during high-volume posterior-chain work when grip fatigue is not the main training objective.
Brace Before Breaking the Floor
Bracing creates pressure around the trunk and helps the body transfer force efficiently from the floor into the bar. It should happen before the repetition begins, not after the weight is already moving. A weak or delayed brace often causes the torso to change position as soon as the plates leave the ground.
Start by taking a controlled breath into the abdomen, sides, and lower back. Imagine filling the entire waist rather than lifting only the chest. Then tighten the trunk as though preparing to absorb contact. The goal is firm, three-dimensional pressure around the torso.
Next, engage the lats by drawing the upper arms toward the body and creating tension around the armpits. This helps keep the bar close and connects the upper body to the hips. The shoulders should not be aggressively pulled backward, but the upper body should feel organised and secure.
Before lifting, gently pull upward on the bar until you feel the slack leave the system. With iron plates, you may hear the bar make contact with the top of the plate openings. This step reduces the tendency to jerk the bar suddenly.
Once the feet, grip, trunk, and lats feel connected, push through the floor and begin the repetition smoothly.
Execute Every Deadlift Repetition Correctly
Once the setup is complete, the deadlift should become a coordinated whole-body movement rather than a sequence of disconnected actions. The feet apply force into the floor, the knees and hips extend, the trunk remains braced, and the upper body keeps the load close. When these elements occur together, the bar usually moves in a controlled and efficient path.
Many technical errors appear during the first few centimetres of the pull. A lifter may lose balance, allow the hips to rise too quickly, relax the lats, or change the spinal position before the bar reaches the knees. For this reason, the initial movement from the floor deserves particular attention.
The middle portion of the lift requires the bar to pass the knees without being pushed forward. The knees must move out of the way as the hips continue extending. At the top, the lifter should reach a balanced standing position rather than forcing the torso behind the bar.
The lowering phase also matters. Dropping the weight without control may be suitable in certain competitive or facility settings, but most recreational lifters benefit from learning how to return the bar efficiently. A controlled descent reinforces the hip hinge and helps prepare for the next repetition.
Advanced lifters may move heavy weights quickly, but speed should result from force production rather than a rushed setup. Beginners should first prioritise consistency, tension, and position. Once these qualities become automatic, lifting speed often improves naturally.
Push the Floor Away
The cue “push the floor away” encourages the lifter to use the legs and hips together rather than trying to pull the bar upward with the back and arms. At the beginning of the repetition, maintain the brace and apply force through the whole foot as though performing a powerful leg press against the ground.
The hips and shoulders should begin moving at approximately the same time. They do not need to travel at an identical speed throughout the entire lift, but the hips should not shoot upward while the bar remains on the floor. When that happens, the knees straighten too early, and the movement becomes a more demanding stiff-legged pull.
Hips rising first may indicate that the starting position is too low. It can also result from insufficient tension, weak leg drive, poor balance, or a load that exceeds the lifter’s current technical ability.
Practise the initial movement with lighter weights and paused repetitions. Pause briefly as soon as the plates leave the floor while maintaining the same trunk and hip position. This helps reveal whether the body stays connected.
The goal is not to squat the bar up. It is to push through the floor while maintaining the hinge, allowing the knees and hips to extend in a coordinated manner.
Keep the Bar Close to Your Body
A close bar path reduces unnecessary leverage and helps the lifter remain balanced over the middle of the foot. During a conventional deadlift, the bar should travel close to the shins before moving along the thighs. It does not need to scrape the skin, but a visible gap often indicates that the bar has drifted forward.
Lat engagement plays an important role in controlling the bar. Before pulling, create tension around the armpits and imagine drawing the bar toward the body. Maintain this tension as the bar rises rather than allowing the shoulders to collapse forward.
The knees must also move appropriately. If they remain too far forward, the bar may be forced around them. If they straighten too early, the hips may rise and leave the torso in a weak position. A good setup allows the bar to pass the knees smoothly.
Some lifters benefit from wearing long socks, leggings, or shin guards while learning. This allows them to keep the bar close without worrying about minor contact with the legs.
Record the lift from the side and watch the end of the barbell. Ideally, it should move in a mostly vertical line. Small variations are normal, but large forward swings suggest a setup, balance, or lat-tension problem.
Finish With Hip Extension, Not Backward Leaning
The deadlift lockout is complete when the lifter stands tall with the hips and knees extended and the body balanced over the feet. It does not require pushing the hips excessively forward, leaning the shoulders backward, or forcefully arching the lower back.
As the bar passes the knees, continue extending the hips while maintaining the brace. Think about bringing the hips toward the bar rather than pulling the shoulders behind it. At the top, the ribs should remain stacked over the pelvis, and the glutes should be active without excessive squeezing or pelvic thrusting.
Backward leaning often occurs because the lifter misunderstands the lockout cue or struggles to finish hip extension. It may also happen when the bar drifts forward earlier in the repetition, forcing the lifter to compensate at the top.
To lower the weight, push the hips backward first while keeping the bar close to the thighs. Once the bar passes the knees, bend the knees and return the plates to the floor. Avoid bending the knees too early because this can cause the bar to collide with them.
After the plates settle, reset your breath, brace, and body position. For technique development, deliberate repetitions are generally more useful than bouncing rapidly into the next lift.
Fix the Most Common Deadlift Mistakes
Deadlift mistakes rarely occur in isolation. A visible problem at one point in the lift may be caused by an earlier setup error. For example, a bar that drifts forward may result from poor lat engagement, but it may also be caused by the bar starting too far from the foot, the knees pushing it forward, or the lifter losing balance toward the toes.
This is why technical correction should focus on causes rather than appearances alone. Simply telling a lifter to “keep the bar close” may not solve the problem if the starting stance makes a close path impossible. Similarly, telling someone to “keep the chest up” may create excessive spinal extension without correcting the actual issue.
A useful troubleshooting process begins with the setup. Confirm bar position, stance, foot pressure, grip, breathing, and hip height before analysing the rest of the repetition. Then observe the first movement from the floor, the transition around the knees, and the final lockout.
Only change one or two elements at a time. Too many cues can create confusion, especially for beginners who are still learning basic body awareness. Choose the correction that is most likely to improve several related problems.
Advanced trainees should also consider fatigue and programming. A technique issue that appears only during the final repetition of a heavy set may not require a complete movement overhaul. It may simply show that the load, volume, or rest period exceeded the lifter’s current capacity.
Use This Deadlift Troubleshooting Table
| Problem | Likely Cause | Practical Correction |
|---|---|---|
| Bar moves around the knees | Bar begins too far forward or knees travel forward too early | Start over the midfoot and hinge before bending the knees |
| Hips rise before the bar | Hips begin too low, tension is poor, or leg drive is lost | Raise the hips slightly and push through the floor |
| Bar drifts away from the legs | Weak lat tension or balance shifts toward the toes | Engage the armpits and maintain whole-foot pressure |
| Lower back position changes suddenly | Inadequate bracing, excessive fatigue, or too much weight | Reduce the load and brace before every repetition |
| Bar is jerked from the floor | Slack is not removed before pulling | Build tension gradually before initiating the lift |
| Knees lock before the hips | Poor coordination or hips rise too quickly | Practise paused and tempo deadlifts |
| Lifters lean backward at lockout | Lockout is exaggerated or hip extension is poorly timed | Finish tall with the ribs positioned over the pelvis |
| Grip fails before the target muscles | Grip strength or grip choice limits the set | Train grip directly or use straps strategically |
Use the table as a starting point rather than a complete diagnosis. One visible error can have several causes, and the correct solution depends on the entire movement. Record the lift, compare multiple repetitions, and identify when the problem begins.
If the issue appears during every warm-up set, it is probably a technical or mobility concern. If it appears only under heavy fatigue, programming or load selection may be the more important factor.
Stop Technique Breakdown Before It Becomes a Habit
Fatigue is a normal part of strength training, but severe technique breakdown should not be treated as a requirement for progress. As a set continues, grip strength decreases, breathing becomes less organised, trunk control may weaken, and the lifter may rush the setup to complete the remaining repetitions.
The first sign of fatigue is not always dramatic. You may notice the bar moving slightly farther forward, the hips rising earlier, or the lockout becoming slower. These changes provide useful information about when the set should end.
For technique-focused training, stop when you can no longer reproduce the main features of your intended movement. This does not mean every repetition must look perfectly identical. Small changes are expected, especially during challenging sets. The concern is a significant loss of balance, bracing, bar control, or joint coordination.
Leaving one to three technically strong repetitions in reserve is often more productive than forcing a final repetition with poor form. This approach allows you to accumulate useful volume without reinforcing compensation patterns.
Advanced athletes may occasionally train closer to failure within a carefully managed program. However, beginners and recreational lifters usually gain more from consistent high-quality practice. Strength develops over repeated sessions, not from one uncontrolled set that creates excessive fatigue and disrupts recovery.
Use Video to Evaluate Your Form
Video is one of the most practical tools for improving deadlift form because it allows you to review details that may be difficult to feel during the repetition. Place the camera at approximately hip height and use a side or front-side angle that clearly shows the feet, bar, knees, hips, shoulders, and lockout.
Begin by reviewing the setup. Check whether the bar starts over the middle of the foot, whether the stance remains stable, and whether the lifter finishes bracing before the pull. Next, observe whether the hips and shoulders rise together and whether the bar stays close to the body.
Do not analyse every possible issue at once. Select the most important correction and apply one cue during the next set. For example, if the bar starts too far forward, fix the initial position before worrying about lockout speed.
Compare repetitions within the same set and across several sessions. A single unusual repetition may not represent a lasting problem. Consistent patterns provide more useful information.
Whenever possible, review footage with a qualified strength coach who understands individual differences. Avoid relying entirely on social-media comments, as viewers may judge technique from incomplete angles or apply rigid rules without considering anatomy, training goals, load, and experience.
Use Drills and Variations to Improve Deadlift Form
Deadlift drills and accessory exercises are most effective when they address a clearly identified weakness. Adding several variations without understanding their purpose can create extra fatigue while providing little technical benefit. Each exercise should have a reason for being included in the program.
If the lifter loses position immediately after the bar leaves the floor, paused deadlifts may improve control. If the bar drifts forward, tempo work and lat-focused drills may help. If the lifter struggles to hinge, Romanian deadlifts can reinforce hip movement and hamstring tension. If the standard barbell setup is uncomfortable, a trap bar or elevated deadlift may provide a more suitable starting point.
The chosen variation should be lighter than the main deadlift when technical precision is the goal. Trying to set personal records on every accessory movement defeats the purpose of controlled practice. Use loads that allow you to feel the intended position and complete every repetition consistently.
Beginners may benefit from simpler regressions, including kettlebell deadlifts, rack pulls, block pulls, and elevated trap-bar deadlifts. These exercises reduce the required range of motion and make it easier to practise bracing and standing with the weight.
Advanced lifters can use more specific variations based on sticking points and competition technique. However, the main movement should still receive regular practice. Accessories should support the deadlift rather than replacing it unless pain, equipment limitations, or a planned training phase requires a temporary change.
Practise Paused and Tempo Deadlifts
Paused deadlifts require the lifter to stop the bar briefly at a selected point while maintaining tension. A common pause occurs just after the plates leave the floor, where many lifters lose their brace, allow the hips to rise, or let the bar drift forward.
Use a lighter load and pause for one or two seconds without relaxing. The bar should remain close, the feet should stay balanced, and the trunk position should remain controlled. After the pause, continue the lift smoothly rather than jerking into the second phase.
Tempo deadlifts slow a portion of the movement. For example, you may lift the bar from the floor over three seconds or lower it under control for four seconds. The slower speed increases awareness and exposes small changes in balance or body position.
These variations should not be excessively heavy. Their purpose is to improve movement quality, not test maximum strength. Sets of two to five controlled repetitions are usually sufficient.
Paused and tempo deadlifts can also improve confidence because the lifter learns to maintain tension in difficult positions. However, they create additional time under tension and may produce more fatigue than standard repetitions. Use them strategically within the program and reduce the weight enough to preserve the intended technical benefit.
Strengthen the Hip Hinge With Romanian Deadlifts
The Romanian deadlift is an effective accessory exercise for developing the hip hinge, hamstring strength, glute control, and the ability to keep the load close to the body. Unlike the standard deadlift, it usually begins from a standing position rather than from the floor.
Hold the bar securely, soften the knees, and push the hips backward while maintaining a controlled trunk position. The bar should slide close to the thighs and lower legs as the torso inclines forward. Continue lowering only while you can maintain balance, lat tension, and hamstring control.
The goal is not to reach the floor. The appropriate depth depends on hamstring flexibility, limb lengths, body control, and the ability to maintain the intended position. Forcing extra range may cause the pelvis or spine to move in ways that reduce the training benefit.
To return to standing, push the feet into the floor and extend the hips. Avoid turning the movement into a squat by bending the knees excessively.
Romanian deadlifts are particularly useful for lifters who struggle to feel the posterior chain or who lower the bar with poor control. Dumbbells can be used when a barbell is unavailable. Straps may also help during higher-repetition sets when grip fatigue prevents the hamstrings and glutes from receiving enough training.
Select the Right Deadlift Variation
Conventional, sumo, and trap-bar deadlifts use different body positions and distribute muscular demands differently. No single variation is automatically best for every lifter. The appropriate choice depends on anatomy, mobility, training goals, experience, equipment, and comfort.
The conventional deadlift uses a relatively narrow stance with the hands outside the legs. It often involves greater torso inclination and may place substantial demand on the posterior chain. Many lifters prefer it because the setup is straightforward and closely resembles common lifting tasks.
The sumo deadlift uses a wider stance with the hands inside the knees. It may reduce the range of motion for some lifters and create a more upright torso position. However, it requires comfortable hip positioning and should not be forced through pain or excessive turnout.
The trap-bar deadlift places the lifter inside the frame of the bar. This arrangement can make balance easier and may allow greater knee involvement. It is often useful for beginners, athletes, and people who find a straight bar difficult to position.
Test variations with manageable loads rather than judging them from appearance alone. The best option is usually the one that supports your goal, feels stable, allows consistent progression, and can be trained without unwanted symptoms.
| Deadlift Variation | Best For | Main Benefits | Considerations |
|---|---|---|---|
| Conventional Deadlift | General strength and powerlifting | Builds the posterior chain and full-body strength. | Requires good hip mobility and proper hip hinge mechanics. |
| Sumo Deadlift | Lifters with suitable hip mobility or longer torsos | Reduces the range of motion for some lifters and may improve leverage. | Requires wider stance mobility and proper foot positioning. |
| Romanian Deadlift | Improving hip hinge technique and hamstring strength | Develops hamstrings, glutes, and spinal control. | Starts from standing rather than the floor. |
| Trap-Bar Deadlift | Beginners and athletes | More upright posture and often easier to learn. | Uses different mechanics than a straight barbell deadlift. |
| Paused Deadlift | Technique improvement | Reinforces positioning and bar control off the floor. | Requires lighter weights due to increased difficulty. |
| Tempo Deadlift | Building movement consistency | Improves control, balance, and bar path awareness. | Slower repetitions increase time under tension and fatigue. |
Improve Your Deadlift Technique Through Better Programming
Technique does not improve through cues alone. It also depends on how the exercise is programmed. Training frequency, load, repetition range, fatigue, rest periods, exercise order, and recovery all influence whether the lifter can practise high-quality repetitions consistently.
Many people attempt to improve their deadlift by lifting heavier every week, but repeated maximum-effort training often reduces the amount of useful technical practice. Heavy singles have a place in strength programs, especially for experienced powerlifters, but they should not form the entire training plan.
Most lifters benefit from combining moderate working sets with lighter technique-focused work. The heavier session develops strength and confidence, while the lighter session provides additional practice without the same level of fatigue. Romanian deadlifts, paused pulls, rows, split squats, and trunk exercises can support the main lift when selected carefully.
Progress should also be based on performance quality. If the bar speed slows dramatically, the setup becomes inconsistent, or recovery is poor, adding more weight may not be appropriate. Maintain or reduce the load until the movement becomes stable again.
Rest periods should be long enough to restore breathing, grip, and concentration. Rushing between challenging sets often causes technical errors that are mistakenly blamed on weakness.
Programming should match the individual. Beginners generally need frequent practice with manageable weights. Advanced lifters may require more specialised volume, intensity, and variation. In both cases, the objective is the same: build strength while preserving repeatable technique.
Warm Up Without Creating Fatigue
A deadlift warm-up should prepare the body and rehearse the movement without exhausting the muscles needed for the working sets. Begin with several minutes of easy activity if it helps you feel more comfortable, but avoid turning the warm-up into a separate conditioning workout.
Next, use a small number of mobility and activation exercises that address your individual needs. Suitable options may include bodyweight hip hinges, glute bridges, controlled squats, bird dogs, light rows, or gentle hip movements. These exercises should improve readiness rather than create burning fatigue.
The most important part of the warm-up is the progressive deadlift sets. Start with a light weight and perform several controlled repetitions using the same setup you plan to use during the working sets. Increase the load gradually while reducing the number of repetitions.
For example, you may complete five repetitions with a light weight, three repetitions with a moderate weight, and one or two repetitions as you approach the working load. The exact sequence depends on strength level and session intensity.
Avoid performing too many warm-up repetitions. Excessive volume can fatigue the grip, hamstrings, or lower back before the main training begins. Every warm-up set should have a purpose: increase readiness, confirm technique, or bridge the gap to the working weight.
Use Manageable Loads for Technical Practice
Technical practice works best when the weight is challenging enough to require focus but light enough to control. If the load is too light, certain errors may not appear. If it is too heavy, the lifter may be forced to compensate before learning the correct movement.
For many lifters, sets of three to six repetitions provide a useful balance between practice and fatigue. Lower repetitions allow greater concentration on each setup, while moderate repetitions provide enough volume to reinforce the pattern. Higher-repetition deadlifts can be used, but technique often deteriorates as breathing and grip fatigue increase.
Rate of perceived exertion can help guide load selection. A set that feels like you could complete two or three additional repetitions usually provides a suitable training stimulus without requiring failure. Beginners should be especially conservative while developing body awareness.
Do not increase the weight simply because the planned number of repetitions was completed. Consider whether the bar remained close, the brace was consistent, and the lockout was controlled.
Advanced lifters may use heavy singles or doubles to practise competition-specific technique. These sets should still be performed with intent and should fit within a structured program.
Manageable loading is not a sign of undertraining. It is a practical way to accumulate high-quality repetitions, strengthen the relevant muscles, and create a foundation for heavier lifting later.
Create a Simple Progression Process
A simple progression system helps you improve without changing several variables at once. Begin by selecting one technical priority, such as keeping the bar closer, improving the brace, or preventing the hips from rising early. Practise that priority during every warm-up set before evaluating it under working weight.
Use the following process:
- Choose one main technical focus.
- Practise it with light warm-up sets.
- Record one or two working sets.
- Stop sets when movement quality changes significantly.
- Review the footage after the set.
- Maintain the same load until the technique becomes repeatable.
- Add a small amount of weight and reassess.
Progress does not need to occur every session. Sometimes repeating the same weight with better control is a meaningful improvement. You may also progress by adding one repetition, completing an additional set, reducing effort, or improving bar speed.
Avoid changing stance, grip, shoes, cues, and accessory exercises simultaneously. Too many adjustments make it difficult to understand what actually helped.
In my experience, lifters improve faster when they follow a stable process for several weeks. Consistency provides enough information to identify patterns, measure progress, and make thoughtful changes instead of reacting emotionally to one difficult session.
Quick Answer About How to Improve Your Deadlift Technique
To improve your deadlift technique, begin by making your setup consistent. Place the bar over the middle of your feet, use a stance that allows your knees and hips to move comfortably, and position your hands securely outside your legs. Before lifting, take a controlled breath, brace your entire trunk, engage your lats, and remove the slack from the bar.
Start each repetition by pushing through the floor rather than suddenly jerking the bar upward. Your hips and shoulders should rise together while the bar remains close to your shins and thighs. Complete the lift by extending your hips and standing tall without leaning backward or overextending your lower back.
Technique improves most effectively when you practise with loads that you can control. Instead of testing your maximum strength frequently, use moderate weights that allow you to repeat the same setup and bar path across every repetition. Record selected sets from the side so you can evaluate your balance, hip position, trunk control, and lockout.
You should also stop a set when your movement quality changes significantly. Continuing through severe fatigue may reinforce poor habits rather than improving strength. Paused deadlifts, tempo repetitions, Romanian deadlifts, and controlled warm-up sets can help you correct specific weaknesses.
In practical terms, better deadlift technique comes from three priorities: consistent positioning, deliberate practice, and gradual progression. When these elements are combined, most lifters can improve both performance and confidence without relying on excessive cues or complicated training methods.
Frequently Asked Questions
Improving the deadlift often raises questions about posture, training frequency, equipment, pain, and exercise selection. Many lifters receive conflicting advice because deadlift technique is sometimes presented as a rigid list of universal rules. In reality, several principles remain consistent, but their exact application depends on the individual.
The bar should generally remain close to the body, the feet should stay balanced, the trunk should remain controlled, and the repetition should begin from a stable setup. However, hip height, stance width, toe angle, grip choice, and torso position can differ substantially between lifters.
Beginners should focus on learning the movement with manageable resistance. Advanced trainees may need more specific adjustments based on sticking points, competition rules, fatigue, and long-term programming. In both cases, progress should be based on repeatability rather than appearance alone.
Equipment such as belts, straps, chalk, lifting shoes, and specialty bars can be helpful, but none of these tools replaces basic positioning and load management. They should solve a specific problem rather than compensate for poor technique.
Pain also requires careful attention. Normal muscular fatigue or delayed soreness differs from sharp, radiating, or worsening pain. Training should be modified when symptoms affect movement, daily function, or confidence.
The following answers address common search questions while recognising that individual coaching or medical evaluation may be appropriate when problems remain unresolved.
How can a beginner improve deadlift form?
A beginner should first learn the hip hinge, whole-foot pressure, bracing, and a close bar path before focusing on heavy loading. Begin with an elevated kettlebell, trap bar, or lightly loaded barbell if lifting directly from the floor creates difficulty.
Practise the setup as a repeatable sequence. Stand with the load over the midfoot, hinge down, grip securely, brace the trunk, engage the lats, and push through the floor. Perform short sets so that fatigue does not interfere with learning.
Recording the movement from the side can help identify whether the bar begins too far forward, the hips rise too quickly, or the lifter leans backward at lockout. Correct one issue at a time rather than using several cues simultaneously.
Beginners should increase the load gradually and only after completing several sessions with consistent technique. A qualified coach can accelerate progress by adjusting the setup to match the lifter’s proportions.
Most importantly, avoid comparing your posture directly with experienced lifters online. Their anatomy, goals, equipment, and training history may be very different. Build a technique that feels stable, controlled, and repeatable for your own body.
Should my back be completely straight during a deadlift?
Your back should remain strong and controlled, but the phrase “completely straight” can be misleading. The human spine naturally contains curves, and individual posture differs. The practical goal is not to flatten every spinal curve but to establish a stable position that does not change suddenly under load.
Before lifting, take a controlled breath and brace around the entire trunk. Maintain that pressure as the bar leaves the floor. If the upper or lower back rounds dramatically during the pull, reduce the weight and review the setup.
Some experienced lifters intentionally use a degree of upper-back flexion, particularly in powerlifting. This is an advanced strategy and should not be copied without understanding the demands, risks, and individual tolerance involved.
Beginners are generally better served by maintaining a controlled position and avoiding deliberate spinal movement under heavy load. The load should match the ability to brace and maintain balance.
If you cannot reach the bar without losing control, consider elevating it on blocks or using a trap bar while developing mobility and technique. A strong deadlift is built through positions you can manage, not by forcing the body into a range it cannot currently control.
Why do my hips rise before the bar moves?
The hips often rise before the bar when the starting position is too low. In that setup, the body may automatically raise the hips to find a stronger pulling angle before the plates leave the floor. This creates the appearance of a failed squat-like start followed by a stiff-legged pull.
Poor bracing can produce the same problem. If the lifter does not create tension before pulling, the hips may move while the bar remains motionless. Excessive weight, weak leg drive, or balance shifting toward the toes can also contribute.
Try raising the starting hips slightly while keeping the bar over the midfoot. Pull the slack out of the bar, brace firmly, and think about pushing the entire floor away. The shoulders should remain slightly in front of or over the bar depending on the individual setup.
Paused deadlifts can help. Lift the bar just off the floor and hold it briefly while maintaining your hip and trunk position. Use a lighter weight so you can control the pause.
If the hips continue rising early, review the stance and bar position. A setup that fits your body proportions should allow the hips and shoulders to begin moving together without forcing an artificially low starting position.
How close should the bar be during a deadlift?
The bar should remain very close to the shins and thighs throughout the deadlift. A close path keeps the load near the body’s centre of mass, improves balance, and reduces unnecessary leverage. However, the bar does not need to scrape the legs aggressively.
Begin with the bar over the midfoot. After gripping it, bring the shins close without pushing the bar forward. Engage the lats by creating tension around the armpits and maintain that connection as the bar rises.
If the bar moves away from the body, check whether your weight is shifting toward the toes. Also examine whether the knees are blocking the bar or whether the upper body loses tension immediately after the pull begins.
Long socks or shin guards can make practice more comfortable, particularly for beginners who are learning to maintain a close path. Smooth knurling contact is different from repeatedly dragging the bar hard against the skin.
Video from the side provides the clearest feedback. Watch the barbell sleeve or plates rather than only the torso. A mostly vertical path is generally efficient, while a large forward loop indicates that the setup or balance needs correction.
How often should I practise deadlifts?
Many recreational lifters improve with one main deadlift session and one lighter hip-hinge or variation session each week. This provides enough exposure to develop technique while allowing time for the back, hips, hamstrings, and grip to recover.
Beginners may practise the movement more frequently when loads are light and total volume is controlled. For example, a short technique session using a kettlebell or empty bar can be added without creating the fatigue of a heavy workout.
Advanced lifters may deadlift once per week, twice per week, or use rotating variations depending on the program. Heavy conventional pulls, paused deadlifts, Romanian deadlifts, and speed work may be distributed across different sessions.
Frequency should reflect the total training plan. Squats, rows, cleans, good mornings, and other posterior-chain exercises also contribute fatigue. More deadlift sessions are not automatically better if performance and recovery decline.
Monitor bar speed, soreness, sleep, motivation, and technique quality. If every session feels slow and unstable, reduce the load, volume, or frequency. The best schedule is one that allows consistent practice, gradual progression, and adequate recovery rather than temporary improvements followed by repeated fatigue.
Is conventional or sumo deadlifting better?
Neither conventional nor sumo deadlifting is universally better. Each variation changes the stance, range of motion, joint angles, and distribution of muscular demand. The best choice depends on body proportions, hip comfort, mobility, training goals, and personal preference.
The conventional deadlift uses a narrower stance and often involves greater torso inclination. It can be an effective choice for developing the posterior chain and may feel natural to lifters with suitable hip and limb proportions.
The sumo deadlift uses a wider stance with the hands inside the legs. It may create a shorter range of motion and a more upright torso for some people. However, it requires comfortable hip positioning and sufficient control in the wider stance.
Powerlifters may choose the variation that allows the greatest competition performance. General fitness trainees can select the version that feels stable and supports consistent training. Athletes may also consider the trap-bar deadlift as an alternative.
Test both styles with manageable weights over several sessions. Do not choose based on one attempt or social-media opinions. The better variation is usually the one that allows you to brace effectively, maintain balance, progress gradually, and train without unwanted discomfort.
Should I wear a lifting belt?
A lifting belt can help some lifters create greater trunk pressure by providing a surface to brace against. It does not physically hold the spine in place, and it cannot replace proper breathing, positioning, or load selection.
Before using a belt, learn how to brace without one. Take a breath into the abdomen and sides, then tighten the trunk while maintaining control. Once this skill is established, place the belt around the waist and expand against it in all directions.
The belt should feel secure but should not prevent breathing or make it impossible to reach the bar. Placement varies between lifters. Some prefer it higher on the torso, while others position it closer to the hips.
Belts are most commonly used during heavier working sets. Wearing one for every warm-up repetition may reduce opportunities to practise natural bracing, although individual preferences differ.
A belt is optional for general strength training. Many lifters make excellent progress without one. Use it when it supports a clear goal, such as improving confidence or trunk pressure during heavy sets. Do not use it as a solution for pain, uncontrolled technique, or weights that exceed your current ability.
What should I do if deadlifts cause sharp back pain?
Stop the set if you experience sharp, sudden, worsening, or radiating pain. Do not attempt to correct the problem by forcing additional repetitions or testing whether a heavier weight feels different. Pain is not always a sign of serious injury, but it should be treated thoughtfully.
Review whether the symptoms appeared after a sudden technical change, rapid load increase, excessive volume, inadequate recovery, or a previous physical issue. Temporarily reduce or remove the aggravating exercise and choose a comfortable alternative if appropriate.
Seek assessment from a qualified healthcare professional when pain persists, affects daily activities, repeatedly returns, or includes weakness, numbness, or symptoms extending into the legs. A clinician can evaluate factors that cannot be identified through online form advice alone.
Urgent medical attention is required for serious warning signs such as new bladder or bowel difficulties, numbness around the saddle area, or severe and progressive leg weakness.
When returning to training, begin with manageable ranges and loads. Elevated deadlifts, trap-bar pulls, Romanian deadlifts, or other variations may be useful if they are comfortable. Rehabilitation should focus on gradual tolerance and individual guidance rather than fear or complete long-term avoidance of movement.
Conclusion
Learning how to improve your deadlift technique requires more than memorising a few lifting cues. The deadlift is a coordinated movement in which the stance, bar position, grip, breath, trunk, hips, knees, lats, and feet must work together. Improving one area can often correct several related problems.
Begin by building a repeatable setup. Position the bar over the midfoot, hinge down without pushing it forward, grip securely, brace around the entire trunk, and engage the lats. Once tension is established, push through the floor while allowing the hips and shoulders to rise together.
Keep the bar close as it passes the knees and complete the repetition by standing tall. Avoid exaggerating the lockout or leaning backward. During the lowering phase, hinge first and bend the knees after the bar has passed them.
Use manageable weights while developing proper deadlift form. Record selected sets, review one issue at a time, and stop repetitions when fatigue causes significant technical breakdown. Paused deadlifts, tempo work, Romanian deadlifts, trap-bar pulls, and elevated variations can help correct specific weaknesses when used with a clear purpose.
Remember that efficient technique will not look identical for everyone. Your stance, hip height, torso angle, and preferred variation should reflect your anatomy and goals. The best deadlift is not the one that copies another athlete perfectly. It is the one you can perform with balance, control, confidence, and consistent progression.